

Before and After: Dated Green Cabinet Goes Farmhouse Chic

This post may contain affiliate links, which means I make a small commission at no extra cost to you.
See my full disclosure here.
I just love the way this project turned out! Our Farmhouse Chic cabinet began as a bright green 1950’s curio cabinet scored for $75 on Craigslist.
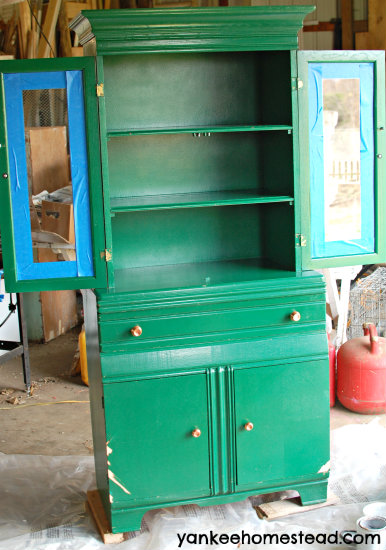
Here it is, just moments before the transformation begins. The pictures really don’t do it justice–it was such a bright, shocking green!
A few coats of paint, a wax job and new “vintage” hardware transformed a dated eyesore into the perfect place to hide our recycling bins and display the boys’ nature treasures.
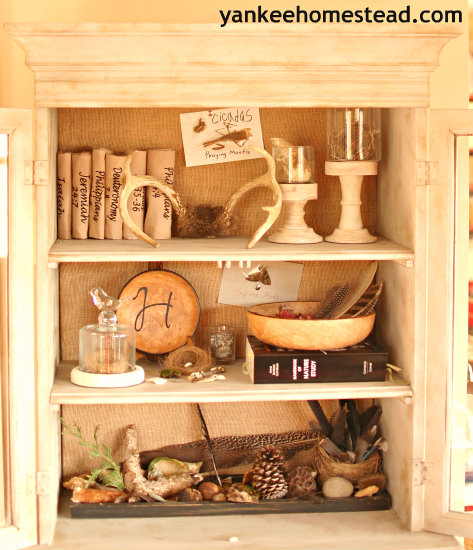
On display: treasures from nature.
I’m no pro–this isn’t meant to be a step-by-step tutorial. BUT if you want more details about the transformation, read on.
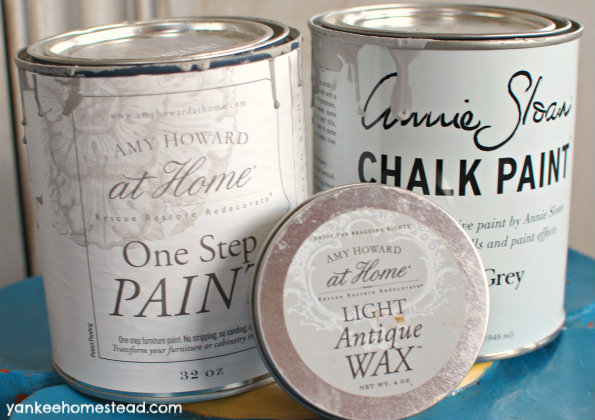
The Supplies
- Amy Howard One Step Paint {Selznick Gray}
- Annie Sloan Chalk Paint {Paris Grey}
- Amy Howard Light Antique Wax
- Paint brush
- Wax brush
- New knobs
- Cardboard panels
- Burlap
- Tape

One of the main goals was to hide our recycling bins. Mission accomplished!
The Procedure
1. Remove old hardware.
2. Mix together dark gray (Amy Howard Selznick Gray) and light gray (Annie Sloan Paris Grey) to create a medium gray. I used a clean plastic (sour cream) container with a lid.
I totally did not measure or calculate–a little of this paint, a little of that paint. I was in a hurry…because newborns need to eat about every three hours, you know.
3. Paint the entire cabinet with three coats of paint. Or maybe just two. Many sleepless nights have passed since then… Let the paint dry between coats. That’s obvious, right?

It’s looking better!
4. Apply wax with a clean brush. I am by no means an expert on this process–I’ve done it only a few times, and I wing it every time. I do recommend reading more detailed tutorials before starting your own project. Check out my Home Decor board on Pinterest for the tutorials and pictures that were helpful to me.
5. Add new hardware–I chose “vintage” glass knobs. Thanks, Hobby Lobby!
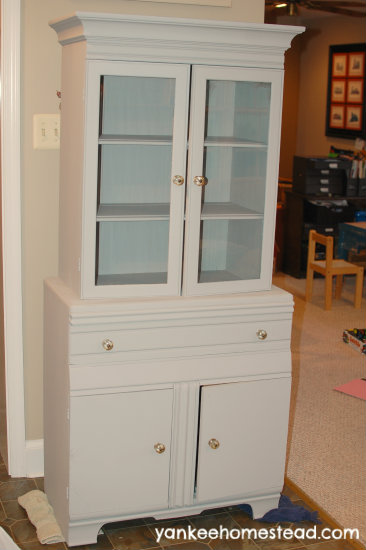
I actually added the hardware first, and then the wax. This is what the cabinet looked like while waiting for the wax job…nice and gray with cute knobs, but still kind of blah.
6. Measure and cut pieces of cardboard to fit the back of the cabinet between each shelf.
7. Wrap each piece of cardboard with burlap (iron the burlap lightly first, to eliminate wrinkles or folds) and secure with strong tape.
8. Insert burlap-covered panels. More details about that here, where we used the same technique on a bookcase: How to Cover the Back of a Bookshelf.

And that’s it!
This fun cabinet increased our storage and display space, hiding unsightly recycling bins while still keeping them handy. And as the first thing we and our guests see from the back door entry, it’s so much nicer to behold. (See “Before” pictures below.)
Don’t you agree?

6 Things About The “Before” Pictures (above)
1. Apparently, this particular space bothered me so much that I never took a clear picture of it. These are the best “Before” shots I could find.
2. Those would be our Christmas cards displayed on the wall rack. We keep them up all year!
3. Our tiny, jumbled Nature Display occupied the main shelf of the wire and woven TV stand from Pier1. I bought that stand long before marrying Mr. Native Texan…
4. The shelf below our nature display once held a stereo system, then a fun wooden box made from old pallets for containing our “to be burned” junk mail and paperwork. That’s what we do out in the country instead of shredding, y’all.
5. And finally, the bottom section held a big round basket for paper recycling. It was handy–but I hated the sight of it! It’s actually ironic that the basket is hidden from view in these pictures…
6. See the baby fence? We used it temporarily while Little Brother was crawling and toddling. He’s now five!

What should I do with the drawer? That’s the one part I haven’t organized yet…
")
Sign up NOW for my best tips delivered weekly to your inbox!
You’ll also get instant access to my library of free ebooks and resources.


Looks amazing! I love it!
Thanks, Emiley! We love it, too. 🙂 (And you’re such an encourager.) 🙂